 Build faster with AI — Get started with the Nium MCP Server
Nium MCP Server
Easily integrate with Nium APIs using AI coding agents and the Nium MCP Server.
The Model Context Protocol (MCP) is a standard that lets AI models interact with external tools and services.
The Nium MCP Server uses MCP to give AI assistants such as Claude, Cursor, and ChatGPT a common, secure connection to Nium. AI coding agents and LLMs can use it to understand the following in natural language:
- Nium APIs
- Nium documentation
- Integration workflows
With this understanding, developers can build, test, and troubleshoot global payments integrations faster, without manually navigating documentation.
Advantages
- Zero infrastructure overhead: Connect to the hosted Nium MCP Server with a URL and an API key. There is nothing to install, host, or maintain.
- AI-powered automation: Run payment workflows, such as onboarding a customer or sending a payout, using natural language commands.
- Faster development: Build and test Nium integrations faster with AI assistance grounded in the Nium API specification.
- Sandbox operations: Run Nium API operations in your Sandbox account directly from your AI assistant.
- Seamless integration: Works with popular AI tools, including Cursor, Claude Code, Claude Desktop, VS Code, Codex, and ChatGPT.
Features
Transform how you build and test global payments integrations with AI-powered automation:
- Explore Nium APIs: Ask questions about Nium APIs, request fields, and call sequences without navigating the documentation.
- Generate integration code: Produce working integration code, such as customer onboarding, beneficiary creation, payouts, and webhook handling, in the language and framework you choose.
- Run Sandbox workflows: Create customers, beneficiaries, and payouts in Sandbox in a single conversation, and check transaction status in real time.
- Check corridor coverage: Look up payout rails, cutoff times, limits, and mandatory beneficiary fields for a destination country and currency.
- Troubleshoot failing requests: Compare a failing request with the API specification to find what's wrong and how to fix it.
See Use Cases for examples and prompts.
Limitations
- Model dependency: Quality varies by model. Different AI assistants produce different results, and no model is perfect.
- Sandbox only: The Nium MCP Server runs in Sandbox only. No production funds are moved. Email developers@nium.com to register interest in production support.
- Hallucination reduction, not elimination: The server grounds your AI assistant in the Nium API specification, but it can't eliminate errors. Always review, validate, and test generated code and recommendations before you use them in production.
- Things your assistant can't do (yet): Make your coffee, approve your pull request, or move production funds. It can, however, ask you nicely for any beneficiary details it's missing.
Learn how MCP (Model Context Protocol) helps tools like Claude, ChatGPT, Cursor, and VS Code work with APIs and documentation.
Before you begin
You need a Nium Sandbox account and an API key.
- Sign in to Nium Portal. No account? Sign up free — Sandbox access is instant.
- Go to Settings → API Keys and copy your API Key.
Using Claude Desktop? See Tutorial: Connect Claude Desktop to the Nium MCP Server for a complete step-by-step guide with screenshots.
Install
- Cursor
- Claude Code
- Claude Desktop
- Codex
- ChatGPT
- VS Code
- Antigravity
- Other
Cursor
Add to CursorAfter clicking, replace YOUR_NIUM_API_KEY in the x-api-key header with your API key.
Or configure manually — add the following to ~/.cursor/mcp.json (global) or .cursor/mcp.json (project root):
{
  "mcpServers": {
    "Nium_Sandbox": {
      "url": "https://mcp-sandbox.nium.com/mcp",
      "headers": {
        "x-api-key": "${env:NIUM_API_KEY}"
      },
      "env": {
        "NIUM_API_KEY": "your_api_key"
      }
    }
  }
}
You can also add via Cursor Settings → Tools & Integrations → New MCP Server and paste the JSON there.
Claude Code
Run this command in your terminal — it's a single step:
claude mcp add-json Nium_Sandbox '{"type":"http","url":"https://mcp-sandbox.nium.com/mcp","headers":{"x-api-key":"${NIUM_API_KEY}"},"env":{"NIUM_API_KEY":"your_api_key"}}'
Replace your_api_key with your actual key before running.
Or add a .mcp.json file to your project root:
{
  "mcpServers": {
    "Nium_Sandbox": {
      "type": "http",
      "url": "https://mcp-sandbox.nium.com/mcp",
      "headers": {
        "x-api-key": "${NIUM_API_KEY}"
      },
      "env": {
        "NIUM_API_KEY": "your_api_key"
      }
    }
  }
}
"type": "streamable-http" works as an alias for "http". Entries with url but no type are treated as stdio — make sure type is set.
Claude Desktop
Claude Desktop does not natively support remote HTTP MCP servers. Use mcp-remote as a local bridge — it proxies requests to the Nium server on your behalf.
Open your Claude Desktop config file:
- macOS:
~/Library/Application Support/Claude/claude_desktop_config.json - Windows:
%APPDATA%\Claude\claude_desktop_config.json
Go to Settings → Developer → Edit Config and add:
{
  "mcpServers": {
    "Nium_Sandbox": {
      "command": "npx",
      "args": [
        "-y",
        "mcp-remote",
        "https://mcp-sandbox.nium.com/mcp",
        "--header",
        "x-api-key:${NIUM_API_KEY}"
      ],
      "env": {
        "NIUM_API_KEY": "your_api_key"
      }
    }
  }
}
x-api-key:${NIUM_API_KEY} — no space around the colon. If the header value has spaces, put them in the env value, not inline.
Fully quit and relaunch Claude Desktop after saving. A restart is not enough.
For a full walkthrough, see Tutorial: Connect Claude Desktop to the Nium MCP server.
Codex
Codex, ChatGPT desktop, and the Codex IDE extension share a single TOML config.
Add to ~/.codex/config.toml (global) or .codex/config.toml (project):
[mcp_servers.nium]
url = "https://mcp-sandbox.nium.com/mcp"
env_http_headers = { "x-api-key" = "NIUM_API_KEY" }

[mcp_servers.nium.env]
NIUM_API_KEY = "your_api_key"
Note: the top-level key is mcp_servers (snake_case), not mcpServers.
Or use the CLI to add the server:
codex mcp add Nium_Sandbox --url https://mcp-sandbox.nium.com/mcp
Then manually add env_http_headers and [mcp_servers.nium.env] to config.toml.
ChatGPT
ChatGPT does not load project config files for MCP. Set it up through the UI.
- Open Settings → Connectors and enable Developer mode (workspace admins may need to allow this first).
- Create a new custom connector.
- Set the MCP server URL to
https://mcp-sandbox.nium.com/mcp. - Add a custom header:
x-api-key=your_api_key. - Scan tools, then enable the connector in chat.
ChatGPT's connector UI does not support env-backed headers — you enter the key directly. If your workspace policy restricts custom connectors, contact your workspace admin.
VS Code
Add to VS CodeAfter clicking, VS Code asks you to confirm the install. Then run MCP: Open User Configuration from the Command Palette and replace your_api_key in the headers section with your API key.
Or configure manually — add to .vscode/mcp.json in your workspace:
{
  "servers": {
    "Nium_Sandbox": {
      "type": "http",
      "url": "https://mcp-sandbox.nium.com/mcp",
      "headers": {
        "x-api-key": "${env:NIUM_API_KEY}"
      }
    }
  }
}
Set NIUM_API_KEY in your shell environment or in a .env file at the workspace root.
Antigravity
In your Antigravity workspace settings or config file, add:
{
  "mcpServers": {
    "Nium_Sandbox": {
      "url": "https://mcp-sandbox.nium.com/mcp",
      "headers": {
        "x-api-key": "your_api_key"
      }
    }
  }
}
Configuration steps:
- Open your Antigravity workspace settings.
- Locate the
mcpServerssection (or create it if it doesn't exist). - Add the
niumserver config shown above. - Replace
your_api_keywith your actual Nium Sandbox API key. - Save the configuration.
- Restart Antigravity or reload your workspace.
Or use an environment variable:
Set NIUM_API_KEY in your environment, then reference it in the config:
{
  "mcpServers": {
    "Nium_Sandbox": {
      "url": "https://mcp-sandbox.nium.com/mcp",
      "headers": {
        "x-api-key": "${env:NIUM_API_KEY}"
      }
    }
  }
}
Other clients
Gemini CLI
Add to ~/.gemini/settings.json (global) or .gemini/settings.json (project):
{
  "mcpServers": {
    "Nium_Sandbox": {
      "httpUrl": "https://mcp-sandbox.nium.com/mcp",
      "headers": {
        "x-api-key": "$NIUM_API_KEY"
      },
      "env": {
        "NIUM_API_KEY": "your_api_key"
      }
    }
  }
}
Use httpUrl, not url. The url field is for SSE — httpUrl is for Streamable HTTP. Using url will fail silently.
Gemini CLI expands $NIUM_API_KEY and ${NIUM_API_KEY} (and %NIUM_API_KEY% on Windows).
Any other MCP client
MCP is an open protocol. If your client supports Streamable HTTP servers, use:
| Setting | Value |
|---|---|
| Nium MCP Server URL | https://mcp-sandbox.nium.com/mcp |
| Header name | x-api-key |
| Header value | your Nium API key |
If your client only supports stdio, use mcp-remote as a proxy (see the Claude Desktop tab for the pattern).
You can now start a new chat and ask a question depending on the available tools.
You're responsible for guarding against prompt injection when you use these tools. Exercise extreme caution, or use MCP tools only on Nium objects you trust.
Your first prompt
After setup, confirm that your AI client is connected by sending a prompt that mentions Nium explicitly:
Using Nium, what APIs do I need to send a payout from Singapore to the US?
If the response references specific Nium endpoints and corridor requirements, you're connected.
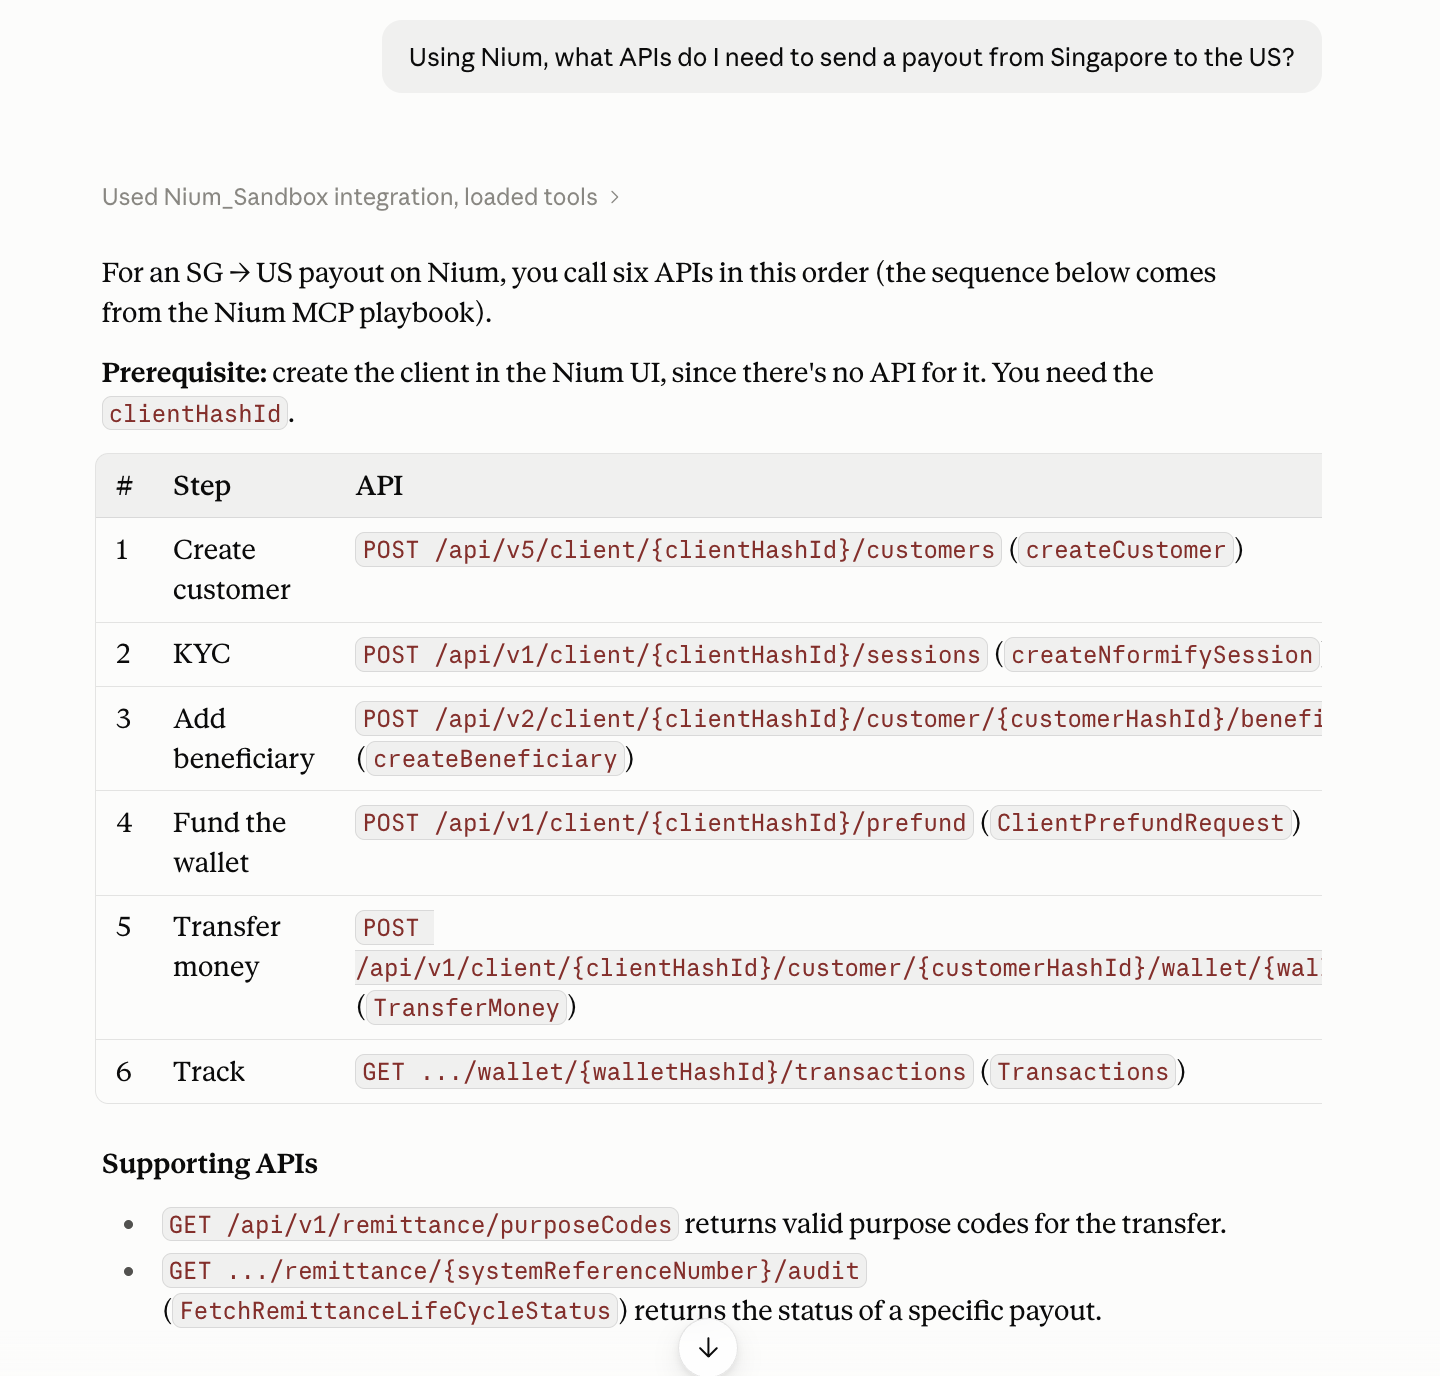
Once you're connected, try one of these prompts next:
Explore what's possible:
What payout corridors from the UK settle same-day, and what are the cutoff times?
Run a Sandbox workflow:
Create a corporate customer in my Nium Sandbox called Meridian Logistics, complete their KYC, add a USD beneficiary with routing number 021000021 and account 12345678, fund the wallet with 5,000 GBP, and send a 1,000 GBP payout.
Generate implementation code:
Generate a TypeScript function that creates a Nium customer, completes KYC, and returns the customer hash. Add error handling for the most common failure states.
How the Nium MCP Server works
Once the Nium MCP Server is connected, you can use any supported AI client to work with Nium APIs in natural language. Each request follows the same four steps:
- Your prompt: You describe what you want in plain language. For example, "Create a corporate customer in my Sandbox" or "Send a 1,000 GBP payout to a beneficiary in the US."
- AI client: Your AI client, such as Claude, Cursor, or VS Code, passes your prompt to the Nium MCP Server.
- Nium MCP Server: The server uses function calling to translate your prompt into the Nium API operations needed to complete the task. It selects the right tool and fills in the request using the Nium API specification.
- Nium API request: The server sends the requests to the Nium Sandbox API and returns the results to your AI client, which presents them in your conversation.
Your AI client can ask you to confirm before the Nium MCP Server runs a write action, such as creating a customer or sending a payout. Review each action before you approve it.
Use Cases
Generate production-ready Nium integration code directly from natural language prompts
The problem: Integrating a payments API means reading the reference, working out the right call sequence, and writing boilerplate. General-purpose AI tools make it faster to write code, but they often invent endpoints or field names, and you only find out when a request fails.
With the Nium MCP Server, your agent builds against Nium's pinned API specification, guides, and corridor data. Use it to start a new app or to add Nium to one you already have.
Start from scratch:
Build a complete Global Payroll Demo application using the Nium MCP Server as the source of truth. Keep the design clean and visual, with minimal text.
Add Nium to an existing codebase:
Look at how my app handles payments today. Using the Nium MCP Server as the source of truth, add Nium payouts: create beneficiaries, send payouts, and handle payout status webhooks. Follow my existing project structure and conventions.
What you get:
- Working code in the language and framework you choose, such as Node.js, Python, or a React front end.
- Request bodies that use the exact field names and the country-specific fields from the API spec.
- Webhook handling based on Nium's integration guides.
- Code that fits your existing structure, when you work from an agent that can read your project.
To add Nium to an existing codebase, use an agent that can read your project files, such as Cursor, Claude Code, or VS Code.
Plan your integration before you build
The problem: Nium has many products and APIs. Working out which ones fit your business, in what order, and with which prerequisites usually means hopping between the API reference, guides, and corridor tables, or waiting on a call.
Try asking:
I run a US marketplace and need to pay freelancers in India and the Philippines. Which Nium APIs do I need, in what order, and what do I need to collect from each beneficiary before the first payout?
We're a travel platform that refunds customers in 20 countries and pays out to local suppliers. Which Nium products and APIs would you combine, and what should I check before building?
What you get:
- The ordered API sequence for onboarding, funding, beneficiary creation, and payout.
- Prerequisites for each step and the mandatory fields for each destination country.
- A recommended architecture, with the trade-offs and open questions to resolve first.
Find out if a corridor works before you build for it
The problem: Discovering late in a project that a country, currency, or payout rail isn't supported, or that a cutoff or limit breaks your flow, is expensive.
Try asking:
Can I send USD from the US to India? Which payout methods, cutoff times, and limits apply, and which beneficiary fields are mandatory for each method?
What you get:
- Available rails per corridor.
- Cutoff times and limits.
- The exact remitter and beneficiary fields you'll need to collect.
Run a full money-movement flow in Sandbox, without writing code
The problem: Proving that a flow works usually means writing scripts, juggling IDs between calls, and debugging before you've seen a single payout go through.
Try asking:
For my client `<insert ClientHashId>`, onboard a corporate customer in the US called Acme Corp and skip KYC in Sandbox. Add 500 USD to their USD wallet, add Jane Doe as a beneficiary with a bank account in India (ask me for any details you need), pay Jane 50 USD, and tell me when the payout completes.
What you get:
- Customer, wallet, beneficiary, and payout created in Sandbox in one conversation.
- Your assistant carries IDs between steps and asks only for what's missing.
- A status check on the transaction at the end.
Sandbox writes are real Sandbox operations. Review each action before you confirm it.
Fix a failing request in minutes, not support-ticket days
The problem: A validation error on a beneficiary or payout request can take hours to decode, especially when the cause is a country-specific field.
Try asking:
My Create Beneficiary request for a US bank account returns this error: `<paste the error and your request body>`. Compare it with the Nium spec and tell me exactly what's wrong and how to fix it.
What you get:
- The mismatch between your request and the spec.
- A corrected request body.
- A Sandbox read-back to confirm the fix, if you ask for one.
Next steps
- Want a full walkthrough for a specific client? See Tutorial: Connect Claude Desktop to the Nium MCP server.
- See the full list of Tools available in every session.
- Running into a setup or connection issue, or have a general question? See Troubleshooting and FAQ.
Can't find what you need? Email us at developers@nium.com.